




A tire rasper rarely goes from “healthy” to “failed” without giving clues. More often, the first warning is commercial: the return conveyor stays fuller, the rubber size drifts, steel is not being liberated as cleanly, or the operator notices that the same feed now needs more load to move through the machine.
That is why good tire rasper maintenance is not just a calendar of grease points and replacement hours. It is a way of connecting blade condition, screen condition, wear parts, drive behavior and product quality before a worn component turns into a longer shutdown.
What Should Be Maintained on a Tire Rasper?
Maintain a tire rasper as a connected cutting system. The main inspection zones are the rotor and stationary blades, knife holders and fastening parts, screen and screen mounts, chamber liners and other wear surfaces, bearings and drive components, and the discharge path around the machine.
For projects that need controlled 10–20 mm wire-free mulch, see YUXI’s Tire Wire Free Mulch Plant.
Why Rasper Wear Shows Up in the Product Before It Shows Up as a Breakdown
A rasper is doing two difficult jobs at once: repeated cutting and steel liberation. The material is elastic, reinforced and inconsistent. A rounded knife can still rotate. A partly blinded screen can still pass rubber. A worn liner can still look “usable” from the outside. The problem is that the process window becomes narrower.
In practice, operators often notice one of four changes first: the machine needs more work to produce the same accepted size, the oversize return increases, liberated steel becomes less consistent, or the material flow becomes less stable. None of those symptoms proves which part is worn. They are prompts to inspect the complete cutting system.
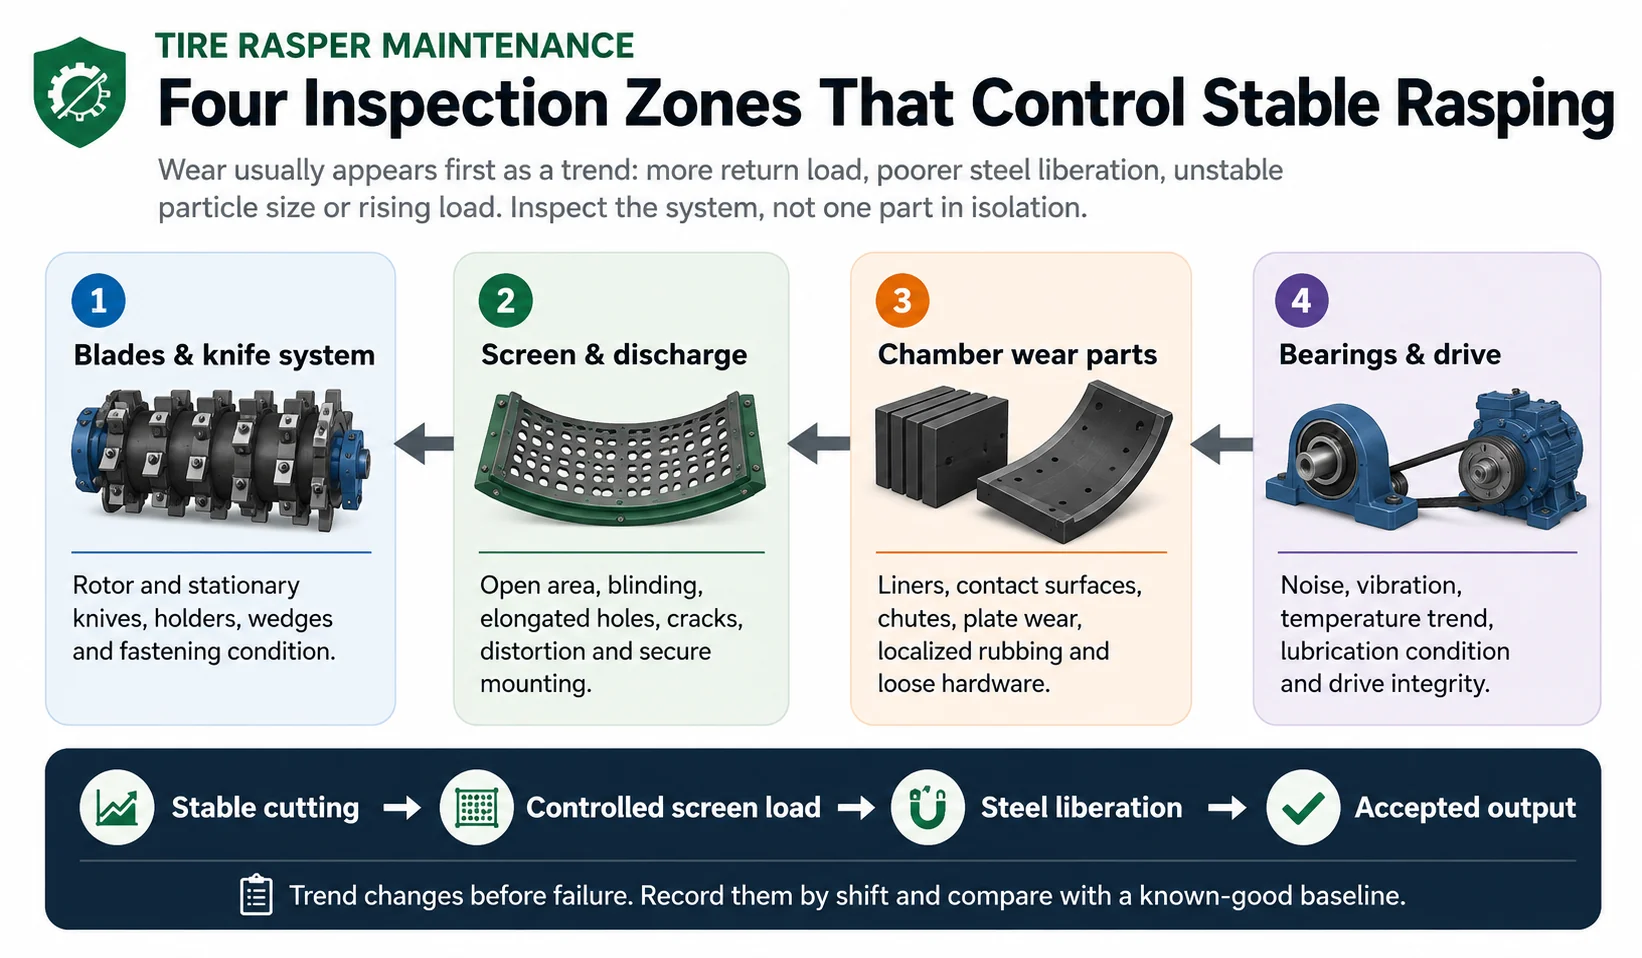
Public rasper documentation from ELDAN illustrates why this needs to be machine-specific. Its Multi Purpose Rasper information describes regrindable knives, quick knife and screen changes, exchangeable wear parts and screens with different hole sizes; its broader rasper description also notes adjustable knife clearance.1 Those details are not YUXI specifications. They are useful industry evidence that knife geometry, screen choice and wear-part design are engineered variables—not universal numbers that can be copied from one machine to another.
Tire Rasper Blades: Inspect the Wear Pattern, Not Only the Running Hours
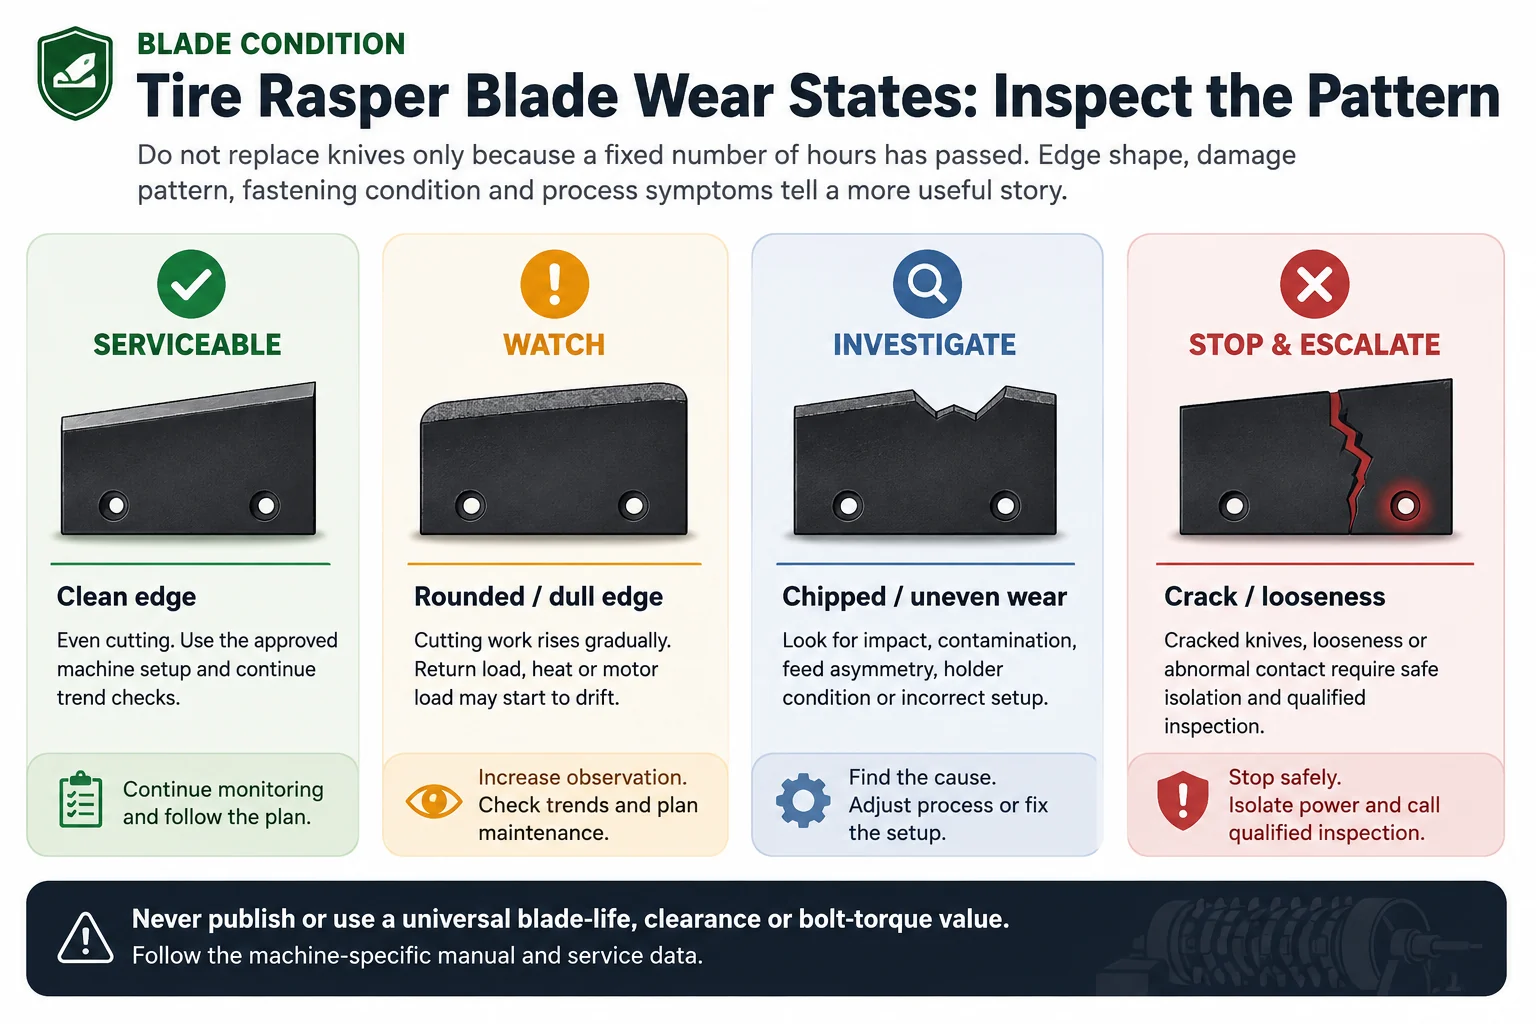
The blade set usually receives the most attention because it is the cutting interface. That attention is justified, but “the blade is worn” is still too broad to diagnose anything. A rounded edge, a chipped edge, one knife wearing faster than the rest and a knife that is loose in its holder point to different causes.
| Observed condition | What it may change | What to investigate |
|---|---|---|
| Evenly rounded or dull edge | Gradual rise in cutting work, return load, heat or inconsistent liberation. | Service history, actual feed mix, sharpening history, screen duty and whether all knives wear at a similar rate. |
| Localized chipping | Uneven cut, vibration or further damage if the defect progresses. | Foreign material, unusually steel-rich feed, impact event, knife support and approved installation condition. |
| Uneven wear across the rotor | Material distribution and cutting load can become unbalanced. | Feed presentation, chamber loading, stationary-knife condition, holders, screen loading and local contact marks. |
| Crack, looseness or abnormal movement | Potential secondary mechanical damage and serious safety risk. | Stop normal operation, isolate energy and escalate under the machine-specific service procedure. |
Sharpening is not automatically the same as replacement
Some industrial rasper knives are designed to be reground several times before final replacement; ELDAN explicitly describes that approach on its public rasper page.1 Whether a particular YUXI knife can be sharpened again, how much material may be removed and what geometry must be restored are part-specific questions. Use the supplied drawing, manual or service instruction rather than a generic sharpening angle.
Do not treat rotor knives, stator knives and holders as one spare
The aftermarket parts market itself separates rasper components into rotor knives, stator knives, blade holders and clamping wedges.2 That taxonomy is useful for maintenance planning, but aftermarket compatibility should never be assumed. A request for “rasper blades” without the machine identity, position and drawing can easily produce the wrong part.
Field note: when one knife shows unusual damage while the rest have normal wear, replacing the entire set may hide the root cause. Photograph the position, examine the corresponding holder and stationary cutting area, and review whether the event followed a feed change or impact.
Knife Clearance, Alignment and Reassembly After Service
Knife clearance changes how the material is cut, how load is transferred and how the knife set behaves. It is also one of the easiest maintenance topics to oversimplify online. There is no safe universal “best gap” for all tire raspers.
After sharpening, turning or replacing an approved knife, confirm every reassembly item required by the machine manual. Depending on the machine design, that can include seating surfaces, holder condition, matched knife positions, clearance measurement, fastening procedure, interference checks and a prescribed rotation or commissioning check.
Do not publish or transfer universal settings. Knife clearance, bolt torque, lubrication grade and service limits are machine-specific. A value from another manufacturer, another rotor diameter or another knife design can create poor cutting or mechanical contact. Use the serial-number-specific YUXI documentation.
The useful acceptance question after a knife service is not “Does it spin?” It is: does the machine return to its known-good behavior under controlled feed? Compare motor-load trend, vibration, sound, return rate, steel liberation and output size with a recent baseline.
Tire Rasper Screen Maintenance: Blinding, Opening Wear and Structural Damage
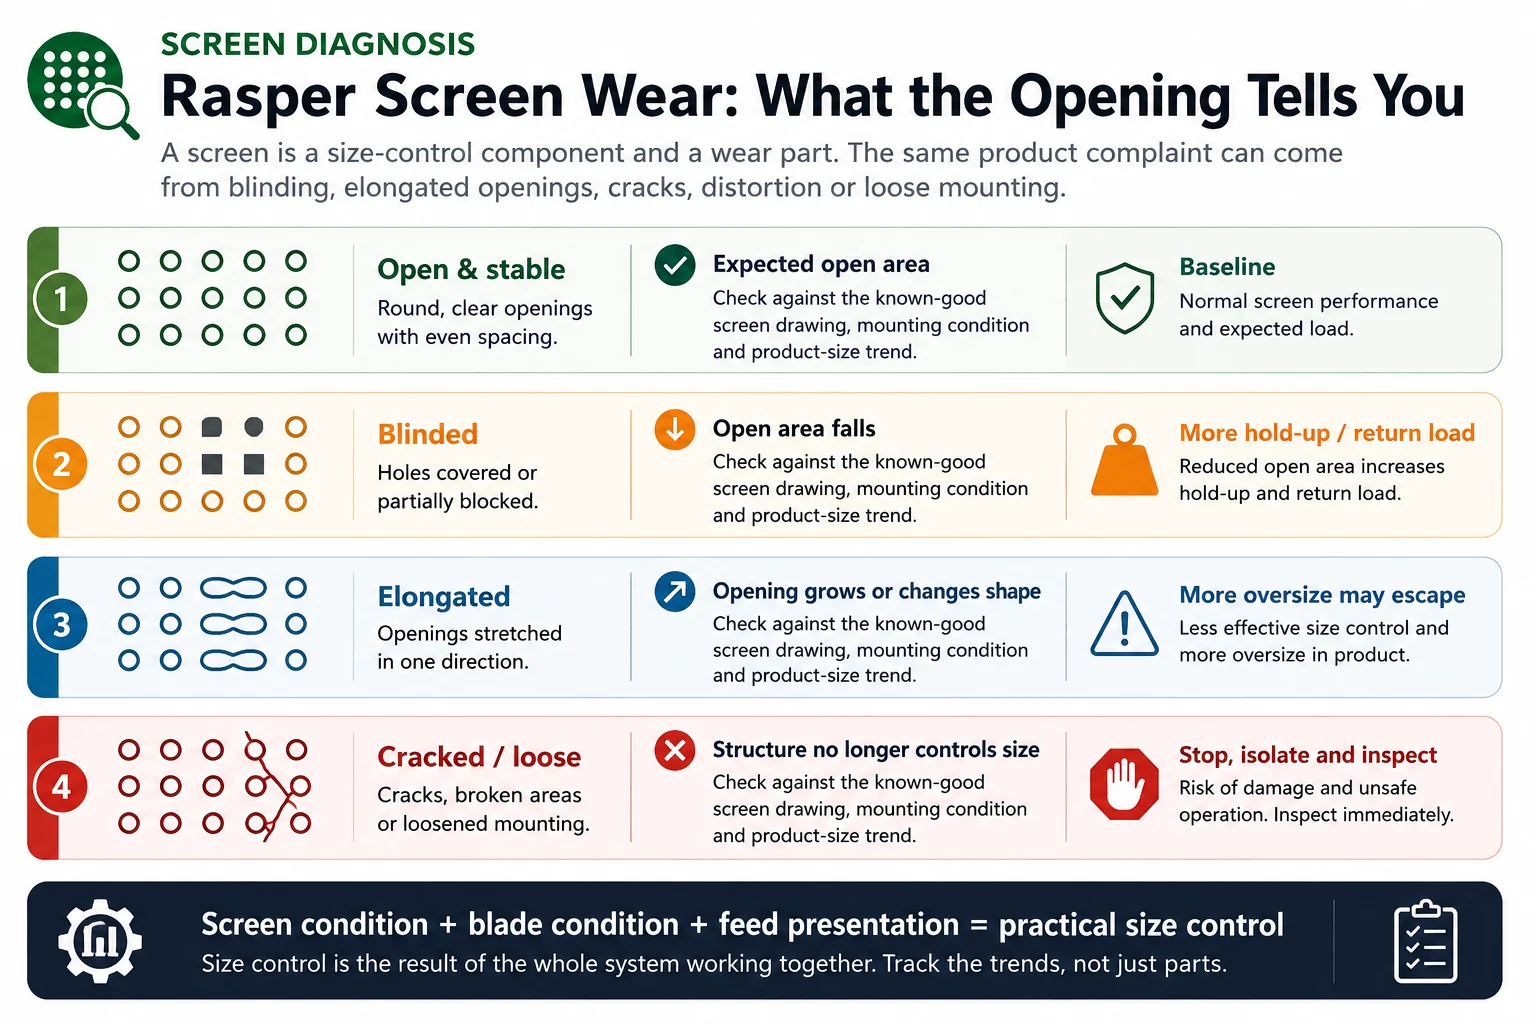
The screen is not merely a hole-size label. It determines how long oversize material remains in the cutting chamber and therefore affects residence time, return load and the practical relationship between feed rate and accepted output.
The 10–20 mm rubber mulch size-control guide goes deeper into particle-size measurement and recirculation. For maintenance, the important question is simpler: does the installed screen still have the geometry, open area and mounting condition that the process assumes?
Screen blinding
Rubber, wire, fiber or contamination can reduce the effective open area. The machine may still be using the same physical screen, but the process now behaves as though it has less screening capacity. The result can be more hold-up, higher recirculation or a shift in load.
Elongated or worn openings
Apertures can lose their intended geometry through abrasive contact and repeated impact. A screen that still looks intact can therefore pass a different particle population. Finished mulch should be checked with the agreed size method; appearance alone will not reveal all oversize.
Cracking, distortion or loose mounting
These conditions move the issue beyond ordinary size drift. They can allow abnormal contact or secondary damage. Treat them under the safe-isolation and qualified-maintenance procedure rather than attempting to “finish the shift” around a compromised component.
Liners, Holders, Wedges, Fasteners and Other Chamber Wear Parts
Knives and screens are the obvious consumables, but the surrounding parts decide whether those components stay in their designed position. Knife holders, wedges, backing surfaces, chamber liners and mounting hardware deserve their own inspection record.
Knife-support parts
Look for fretting, impact marks, deformed seating surfaces, looseness or wear that changes how the knife is supported. A new knife installed against a damaged support may not restore the original cutting condition.
Chamber liners and wear surfaces
Track localized thinning, scoring, rubbing and unusual contact. Compare the same locations over time so a normal polished surface is not confused with progressive material loss.
Screen supports and hardware
Confirm that the screen is secured as designed and that supports are not distorted. A screen problem can start at the mount rather than at the aperture.
Chutes and discharge transitions
Inspect where liberated wire, rubber and fiber repeatedly strike or slide. Build-up or wear can disturb material flow even when the cutting chamber itself is serviceable.
When wear is photographed, include a fixed reference: the same camera angle, a scale where safe, the machine position and the date or operating record. A folder of random close-ups is much less useful than a repeatable condition history.
Bearings and Drive Components: Use Trends, Not Touch-and-Guess Checks
A cutting problem is not always a blade problem. Bearing condition, coupling or belt condition, reducer behavior, lubrication and alignment can change sound, vibration and load. The maintenance goal is to notice a deviation from the known-good machine rather than to publish a generic “normal temperature” for every bearing and gearbox.
- Noise: record a new repeating sound and the operating condition in which it appears.
- Vibration: compare the same measurement location and operating state over time when the site uses vibration monitoring.
- Temperature: trend the approved measurement point and method; do not judge a rotating component by hand.
- Lubrication: follow the machine and component manufacturer’s specified lubricant, quantity and interval.
- Drive inspection: check the machine-specific requirements for coupling, belt, reducer, mounting and guards during planned shutdowns.
Diagnostic rule: if a load or vibration change begins immediately after blade or screen work, first verify the work that was just completed. If it appears gradually with no maintenance event, compare feed, wear and drive trends before changing parts.
Build a Condition-Based Maintenance Cadence Around Four Triggers
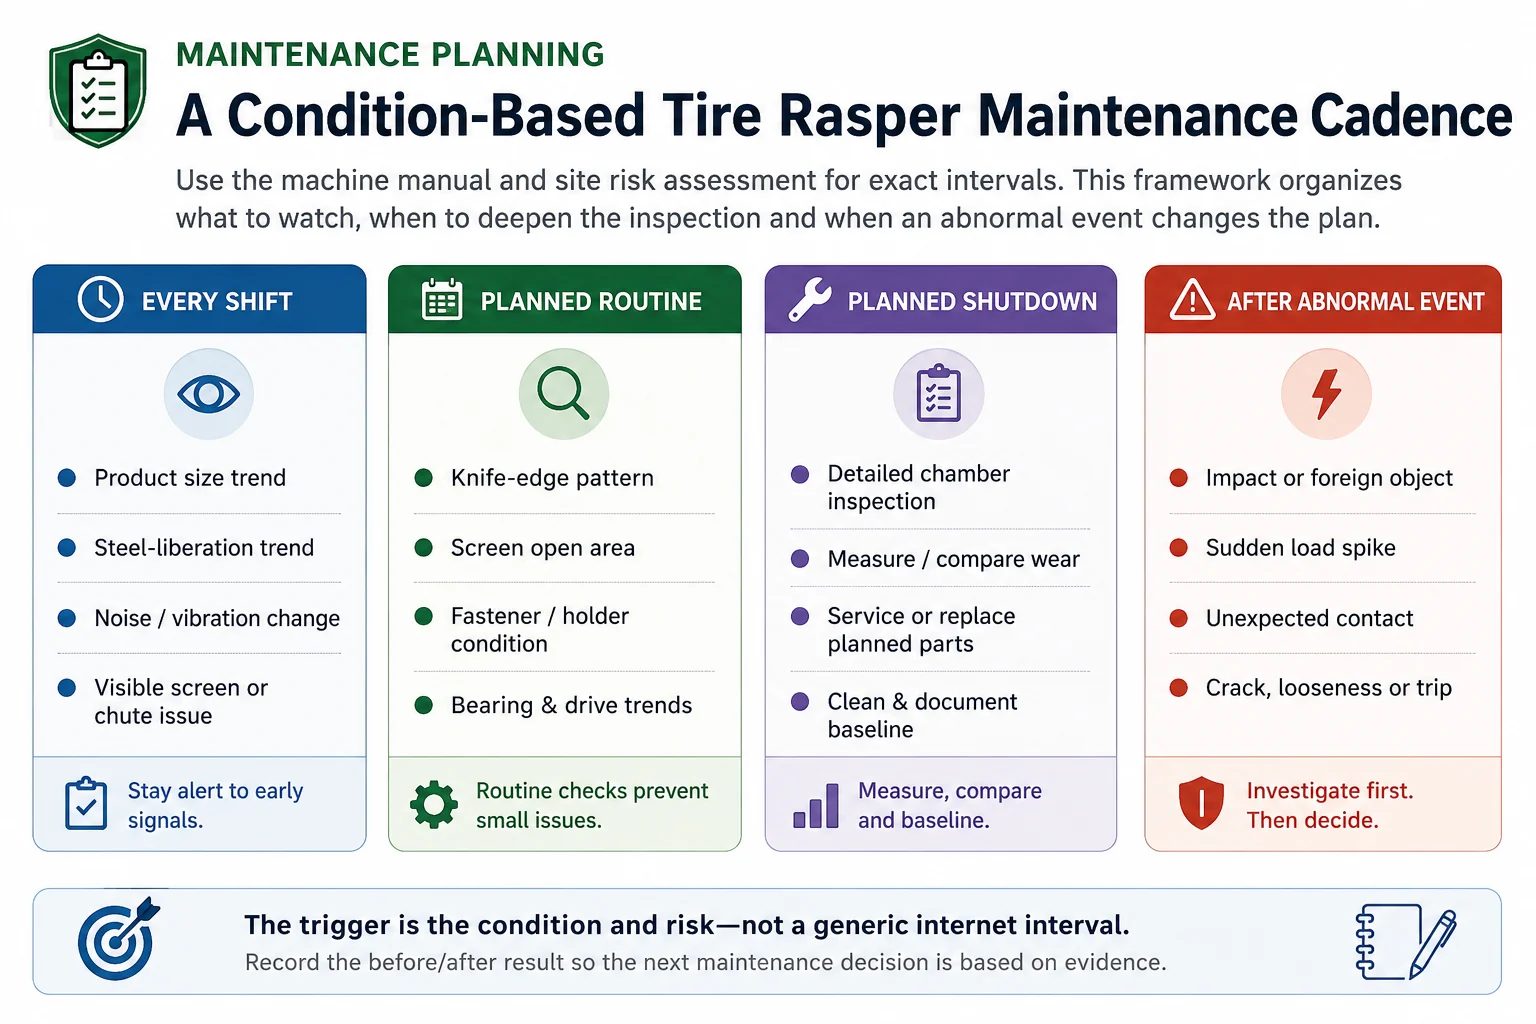
A useful schedule has layers. Exact time intervals belong in the machine documentation and the site’s preventive-maintenance program. The framework below tells the team what kind of evidence belongs at each level.
1. Every-shift operating observations
Record output-size trend, return-load trend, visible steel-liberation complaints, abnormal noise or vibration, unusual smell or heat indication, and any feed change. These observations are fast, but they give later inspections context.
2. Planned routine inspection
Under the approved safe state, inspect knife-edge pattern, visible holder and fastening condition, accessible screen condition, chamber build-up and drive indicators required by the manual. Compare findings with the previous record.
3. Planned shutdown inspection
Use the longer shutdown to perform the inspections that require guarded-area access, measurements, deeper cleaning or planned wear-part service. Prepare replacement parts and lifting or handling tools before the shutdown begins.
4. Abnormal-event inspection
A foreign object, sudden load spike, severe jam, unexpected contact, loose component, crack or significant vibration change can override the calendar. Isolate the machine and inspect the affected system before returning to normal production.
ELDAN’s maintenance guidance makes the same broader point: regular planned maintenance and having common wear parts such as knives and screens available can reduce unplanned downtime.3 The principle is transferable; the exact intervals and part list are not.
Tire Rasper Maintenance Troubleshooting by Symptom
Troubleshooting is faster when the team starts with the observed change and then separates feed variation from blade, screen and drive condition. Replacing a component without that step can temporarily change the symptom while leaving the cause in place.
| Symptom | First maintenance questions | Do not assume |
|---|---|---|
| Oversize return increases | Did feed size or tire mix change? Are knife edges rounded? Is the screen blinded? Has screen opening geometry changed? Is material distribution uneven? | That the screen must automatically be smaller or the feed must simply be reduced. |
| More visible steel remains in rubber | Is the steel still embedded, suggesting weaker liberation? Did the knife condition or feed change? Is the downstream magnetic burden deeper or less stable? | That every steel complaint is a magnet failure. |
| Motor load rises gradually | Check knife wear, screen open area, chamber build-up, feed composition, bearing/drive trend and return load. | That higher load proves the motor is undersized. |
| Sudden vibration or impact sound | Was there foreign material, a chipped/loose knife, screen damage, abnormal contact or a drive event? | That production can continue until the next planned stop. |
| More fines or heat | Review cutting condition, residence time, screen blinding, repeated recirculation and whether operators changed feed practice. | That finer material automatically means better cutting. |
| Size passes but output falls | Look at screen open area, return loop, blade condition, feed interruptions and productive-time losses. | That product quality and capacity can be diagnosed separately. |
One useful maintenance habit: keep one “known-good” production record after commissioning or a successful service. A future complaint becomes easier to diagnose when the team can compare the same feed class, screen, load trend and product sample rather than relying on memory.
Safe Rasper Maintenance Starts with Hazardous-Energy Control
Blade, screen and chamber work can place a person near cutting edges, rotating parts, stored mechanical energy and potential movement from connected conveyors. The maintenance procedure must therefore begin with the machine manual, the site’s risk assessment and the applicable energy-control procedure—not with the fastest way to reach the worn part.
Safety boundary: do not reach into a rasper, clear a jam, remove a screen, loosen a knife, check a suspected loose part or bypass a guard while hazardous energy is uncontrolled.
A practical maintenance work sequence
- Identify the symptom and the exact maintenance task before shutdown.
- Stop the line using the approved process and isolate all hazardous energy sources that can affect the work zone.
- Verify the required safe state before guards or access panels are opened.
- Inspect and document the condition before removing parts.
- Use the approved tools, lifting method, replacement parts and service instructions.
- Complete required clearance, fastening, lubrication and interference checks.
- Restore guards and remove tools, loose parts and temporary materials.
- Follow the approved restart and controlled-load verification procedure.
After Blade or Screen Work, Recommission the Process—Not Just the Motor
A successful maintenance job is complete when the machine and product have returned to a controlled condition. A no-load rotation or short jog may be one step in the approved commissioning procedure, but it cannot prove cutting performance.
Mechanical verification
Confirm the manual-required assembly checks, guarding, clearance/interference checks, lubrication status and drive condition before introducing material.
Controlled-feed verification
Start with the approved commissioning feed and watch load, vibration, sound and material flow before returning to normal commercial rate.
Product verification
Sample the material for the normal size and steel-liberation checks. A maintenance action that changes the product is not finished until the new condition is understood.
Record the new baseline
Write down what was changed, the parts used, the measured observations and the first accepted production result.
This is especially important after a screen change. A different approved screen can intentionally alter size distribution and residence time, while a new screen of the same nominal specification can still change performance if the previous screen was heavily worn or blinded.
Which Tire Rasper Wear Parts Should You Keep in Stock?
Spare inventory should be built from risk, lead time and operating history—not from a generic internet kit. A high-use plant far from the supplier may justify more local stock than a small line with rapid parts access.
| Spare category | Why it matters | Planning question |
|---|---|---|
| Approved knife set | Direct cutting wear and possible impact damage can stop production. | Can a full planned service be completed without waiting for one missing knife or matched component? |
| Approved screen section(s) | Screen damage or opening wear can change product and throughput. | Which installed screen is critical to the current saleable product? |
| Knife-support / fastening parts | A service may reveal a holder, wedge or approved fastener that cannot be reused. | Which parts are called out as replaceable or non-reusable in the parts list? |
| Selected wear liners / contact parts | Long lead time can turn predictable wear into a long outage. | Which wear location has the most repeatable history at this site? |
| Drive / bearing service parts | Not every component belongs on the shelf, but long-lead critical parts need a recovery plan. | What is the supplier lead time and what condition-monitoring evidence is available? |
A good spare record includes the machine serial number, part number, revision or drawing where applicable, quantity on hand, reorder point, storage condition, last issue date and the machine position. “Two rasper blades in the warehouse” is not enough if the team cannot prove which knife position or revision they fit.
A Simple Tire Rasper Maintenance Record That Is Actually Useful
The best maintenance log connects the physical finding to production behavior. It does not need to be complicated, but it should be consistent.
| Field | Record |
|---|---|
| Date / shift / machine hours or tonnage record | Use the site’s normal production reference so wear can be compared with actual use. |
| Feed condition | Tire categories, pre-shredded size condition, unusual contamination or a known change in supplier/feed lot. |
| Observed symptom | Return-load change, size drift, steel complaint, load increase, noise, vibration, heat indication or abnormal event. |
| Inspection finding | Knife wear pattern, screen condition, holder/liner finding, bearing/drive trend and photographs. |
| Maintenance action | Cleaned, adjusted, sharpened, turned, replaced or escalated—using the exact approved part or procedure reference. |
| Post-service result | Load trend, sound/vibration observation, output sample, return load and whether the accepted product passed. |
| Next action | Continue operation, shorten inspection interval, order spares, schedule shutdown or request supplier review. |
Why this matters: after several service cycles, the plant can estimate its own blade and screen consumption for its real tire mix. That site-specific history is far more valuable than a universal wear-life claim.
What to Send YUXI When You Need Rasper Wear Parts or Technical Support
Parts support is faster when the supplier can identify both the machine and the failure mode. Before sending a message that says “we need rasper blades,” collect the evidence that separates one part from another.
- Machine model, serial number and installation/project reference.
- Exact part position: rotor knife, stationary knife, holder, screen, liner or other component.
- Part number, drawing or previous packing-list reference when available.
- Clear photographs of the complete part and the worn or damaged area.
- Key identifying dimensions or hole pattern if requested by the service team.
- Current feed material, tire mix and upstream chip condition.
- Observed symptom and whether it started gradually or after an abnormal event.
- Current quantity on hand and required replacement quantity.
- Whether the machine is stopped, operating at reduced rate or still producing normally.
Do not order from appearance alone. Two knives can look similar in a photograph while differing in geometry, mounting, material, heat treatment or revision. Machine identity and approved part data come first.
Frequently Asked Questions
How often should tire rasper blades be sharpened or replaced?
There is no reliable universal hour interval. Base the decision on the machine manual, actual tire mix, edge condition, damage pattern, cutting load, product-size trend and steel-liberation performance. Keep a maintenance record so the site can build its own evidence-based interval.
What are the common signs of dull tire rasper blades?
Typical warning signs include a gradual rise in motor load, more oversize return, poorer cutting consistency, more heat or fines, and weaker steel liberation. Confirm the blade condition before assuming the motor, screen or downstream separator is the cause.
When should a tire rasper screen be replaced?
Replace or service the screen when inspection finds cracking, distortion, loose mounting, unacceptable opening wear or another condition outside the machine-specific service limit. Blinding may require cleaning rather than replacement, but it still needs a safe shutdown and root-cause check.
Can a worn rasper screen change 10–20 mm rubber mulch size?
Yes. Reduced open area can increase hold-up and recirculation, while elongated or damaged openings can allow larger pieces to escape. Finished product should be verified by the agreed particle-size method rather than by the screen label alone.
Should tire rasper knife clearance use a universal value?
No. Knife clearance is machine-specific. Use the YUXI machine manual or approved service data for the actual machine and knife set. An internet value from another rasper design should not be transferred to the machine.
Which tire rasper wear parts should be kept in stock?
The spare plan commonly centers on parts with predictable wear or long procurement lead times, such as the approved knife set, screen sections and machine-specific fastening or holder components. The final stock list should come from the supplied parts list and site operating history.
What should be checked after changing rasper blades or a screen?
Before production, confirm assembly, guarding, tools removed, fastener and clearance checks required by the manual, and safe rotation or commissioning steps. Then run controlled material, compare load, noise and vibration with the known-good baseline, and sample the output.
What information should be sent when ordering rasper wear parts?
Send the machine model and serial number, part position, clear photographs, part number or drawing if available, dimensions that identify the part, the observed wear pattern, current feed material and required quantity. Do not order by a generic part name alone.
Need the Correct Tire Rasper Wear Parts for Your Machine?
Send the machine serial number, part photos, feed condition and wear symptoms. YUXI can use that information to identify the correct maintenance scope, replacement parts and service data for the installed rasper.
Sources and Safety References
- ELDAN Recycling. Shredders / Multi Purpose Rasper. Public product information describing knife, screen and wear-part design concepts.
- KAMADUR Industrial Knives. Rasper blades and related parts. Used only to illustrate industry parts taxonomy; not as a YUXI compatibility source.
- ELDAN Recycling. Maintenance saves money. General guidance on preventive maintenance, knife grinding and wear-part availability.